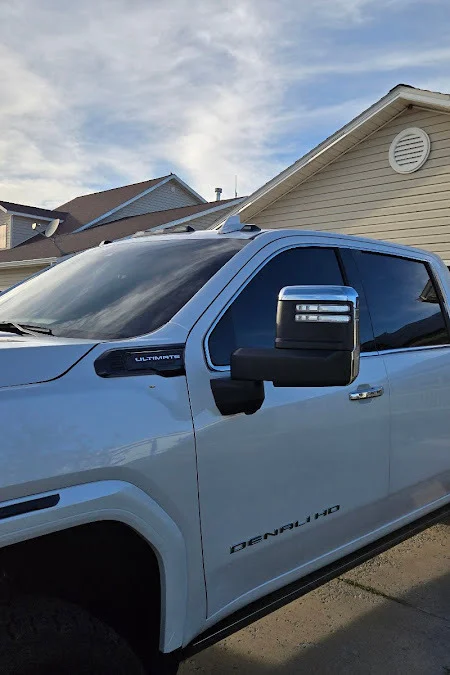
GMC Denali HD Restored Through Professional Tint Correction in Montrose, CO
This GMC Denali HD arrived after a failed tint job left the windows looking uneven and poorly finished. Our team removed the bad film, corrected the issues, and installed new tint the proper way for a clean, factory-level result.
Project Details
Vehicle: GMC Denali HD (White)
Project Type: Professional Tint Removal and Corrective Tint Installation
Goal: Remove a poorly installed tint job and replace it with a clean, uniform, high-quality tint finish
Installer Team: Premium Auto Solutions
Service Location: Montrose, Colorado
Project Area: Western Colorado | Montrose County
Why This GMC Denali HD Needed Window Tint Fix
The owner of this GMC Denali HD reached out after having a frustrating experience at another tint shop in Montrose. The previous install was rushed, uneven, and full of imperfections, leaving the truck looking far from the clean, premium finish a Denali should have. He wanted the job corrected properly by a team that takes pride in doing things right the first time.
When he contacted Premium Auto Solutions, we made room to get his truck in quickly. Our goal was simple: remove the old film safely, clean the glass thoroughly, and install a new tint that looked smooth, consistent, and professionally finished. A Denali carries a bold presence, and the owner wanted the windows to match that look.
By choosing to have the tint corrected instead of living with a poor install, he protected both the truck’s appearance and his long-term visibility. Our team focused on giving him the clean, sharp result he expected, and making sure his experience with us felt honest, straightforward, and hassle-free.
Enhancement Services Performed on This GMC Denali HD
Old Tint Removal and Defect Correction
The previous film was bubbling, hazy, and lifting at the edges, so we removed it using controlled heat, plastic-safe scrapers, and tint-safe adhesive softeners. This allowed us to strip the failed installation cleanly without damaging the glass or the factory defroster lines.
Adhesive Removal and Deep Glass Preparation
Once the film was off, we removed leftover glue with an ammonia-free adhesive remover, followed by a full decontamination process. The glass was scrubbed, clay-treated, and wiped down with a lint-free microfiber system to create a perfectly smooth surface for the new tint to bond to.
Professional-Grade Window Tint Installation
We installed a premium film designed for long-term clarity, UV protection, and consistent shade. Each piece was heat-shaped to match the Denali’s large glass surfaces, aligned precisely, and applied using slip solution for clean movement before squeegeeing into place.
Precision Edge Work and Moisture Extraction
Using soft squeegee blades, air-release tools, and specialized edge buffers, we removed moisture pockets and ensured every corner was tight and fully seated. This technique eliminates future bubbling and gives the tint a clean, factory-style finish.
Final Tint Curing Check and Quality Inspection
The installation was inspected under LED shop lighting to confirm uniform color, smooth clarity, and perfectly seated edges. This final check guarantees the film cures evenly and maintains the premium look expected from Premium Auto Solutions.
Our Tint Correction Process for This GMC Denali HD
Correcting a failed tint job on a truck like the GMC Denali HD requires patience, precision, and a controlled workflow. Large truck windows, deep channels, and heavy weather stripping often hide adhesive and debris left behind from rushed installations. Our team handled every step inside our dedicated tint bay at Premium Auto Solutions, using professional tools and a methodical approach to ensure the new film bonded cleanly and looked flawless.
Step 1: Tint Removal and Deep Glass Decontamination
We began by softening the old film with a controlled heat gun, keeping temperatures low enough to protect the defroster lines but warm enough to release the adhesive evenly. Using plastic razor blades, microfiber-lined edges, and adhesive-releasing steam, we slowly lifted the film without tearing it.
Once the old tint was off, the adhesive underneath needed thorough work. We applied an ammonia-free adhesive dissolver and used tint scrapers with rubber guards to safely lift the residue. To finish the decontamination, the windows were scrubbed with a clay-textured glass pad to remove embedded grime and restore a perfectly smooth surface. This step ensures the new film won’t trap particles or haze underneath.
Step 2: Detailed Glass Inspection and Edge Preparation
With the film removed, we inspected the glass under high-output LED lighting. Any remaining streaks, glue traces, or microscopic debris were circled and cleaned with a dedicated tint prep spray.
Because the Denali’s door windows have deep felt-lined seals, we brushed out the edges using detailing swabs and compressed air to clear lint, dust, and moisture. This prevents contamination from creeping behind the film during installation. Once every surface passed inspection, we masked interior trim and door panels to protect them from slip solution overspray.
Step 3: Measuring, Cutting, and Pre-Shrinking the New Film
We rolled out the premium tint film and measured each window directly on our clean glass board. Using precision tint patterns and clean straightedge cuts, we trimmed the material for tight, accurate fitment.
For curved windows, we heat-shaped the film using a controlled heat gun and a hard card to “pre-shrink” the film before installation. This step ensures the tint lays perfectly flat across the Denali’s tall, wide windows without tension lines, fingers, or distortion. Pre-forming the film also reduces the risk of peeling during curing.
Step 4: Film Installation, Squeegee Work, and Edge Sealing
Once the glass was fully prepared, we flooded the surface with a clean slip solution to allow smooth positioning. The pre-shaped film was placed carefully, aligned to factory edges, and anchored using light pressure strokes.
We then used soft squeegee blades, hybrid air-release tools, and microfiber buffers to remove moisture from behind the film. This part of the process demands patience — each pass pushes out water pockets and ensures a bubble-free result.
Edge sealing came next. Using heat, pressure, and edge cards, we tucked and sealed every corner so the tint cures cleanly, without lifting. On a large truck like the Denali HD, this step is crucial for long-term durability.
Step 5: Curing Check, Glass Finishing, and Delivery Preparation
Once the tint was installed, we monitored how the film settled as the slip solution evaporated. LED lights were used again to inspect every inch of the windows, checking for micro-bubbles, haze, streaks, or alignment issues. Any moisture pockets that needed additional squeegee work were addressed immediately.
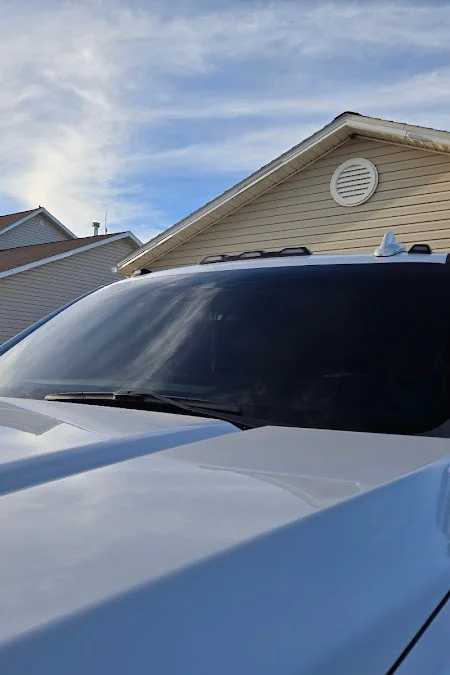
Doors were wiped down, interior glass was polished, and the truck was staged under natural lighting to confirm an even tint shade across all windows. By the time we handed it back to the owner, the Denali HD had a clean, consistent, factory-quality tint finish — the exact result he expected from the start.
Final Results for This GMC Denali HD
Once the tint correction was complete, the difference was immediate. The uneven, bubbling film from the previous shop was gone, replaced with a clean, consistent tint that matched the truck’s bold styling. Every window looked sharp and uniform, with smooth edges and clear visibility throughout.
The truck now carries the polished, factory-quality finish the owner originally wanted. With the new tint properly installed and curing evenly, the Denali HD left our shop looking refreshed, balanced, and professionally done, a result the owner could finally feel confident about.
Client Review
“I had recently taken my truck to a local tinting place and they did a horrible job. I messaged Avery and he got back to me very quickly. He is professional and straightforward. My truck looks great thanks to Avery and Diego. Thanks again.”
Review link : https://share.google/3BZz8m6YswDv7nbru
This review reflects what we aim to deliver at Premium Auto Solutions, clear communication, honest service, and quality work that restores confidence after a disappointing experience elsewhere.
Why Drivers Choose Premium Auto Solutions for Window Tinting
Experienced Installers
Many of the vehicles that come to us have had tint issues elsewhere. Our team understands how to correct bad installs, remove old film safely, and apply fresh tint with clean edges and consistent clarity. That experience shows in every project we take on.
Quality Materials and Professional Techniques
We use high-grade tint films, proper slip solutions, plastic-safe tools, and controlled heat to ensure the tint bonds correctly and looks smooth from day one. The goal is simple: no bubbles, no streaks, and no shortcuts.
A Local Shop Known for Honest, Reliable Service
Drivers in Montrose trust us because we’re straightforward about the process, transparent about the work, and committed to doing the job right. From quick responses to attentive service, we make the entire experience easy and stress-free.
Results That Hold Up Over Time
A clean tint job isn’t just about today, it should last. Our careful prep, clean installation, and detailed inspection help ensure the film cures properly and stays looking sharp long after it leaves the shop.
Ready for Professional Window Tinting Done the Right Way?
The team at Premium Auto Solutions provides clean, precise tint installations and reliable tint correction for trucks, SUVs, and daily drivers across Montrose, CO. If you want your windows done properly with smooth edges, clear visibility, and long-lasting results, reach out to book your appointment today.